Amazon route 53 – how to setup hosted zones?
Amazon web service is one of the famous and most secure web services in the world. It provides several services to solve wide number of problems. Today I am going to discuss about route 53, one of the famous services from the house of Amazon.
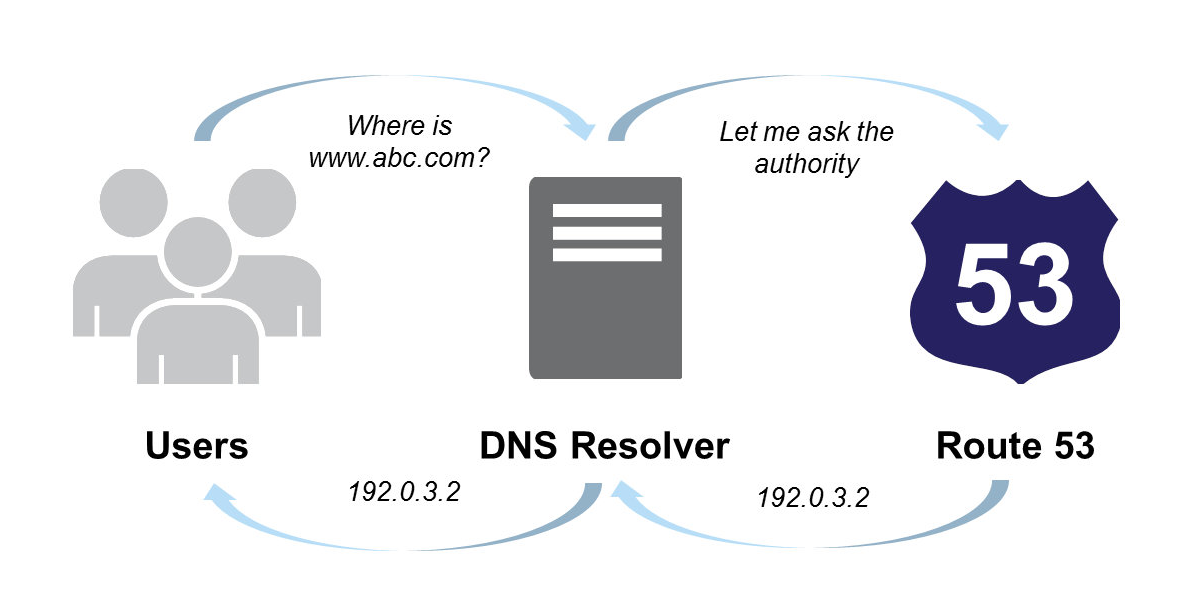
Amazon route 53 is highly scalable DNS web system. This offers a reliable and cost effective way to route end users to Internet applications by translating names into the numeric IP addresses.
Amazon Route 53 Features
Route 53 service has several features; such as:
-
Latency Based Routing
– It routes users by providing lowest possible latency
-
Weighted Round Robin
– It allows developers to specify the frequency (“weights”) with which different DNS responses are returned to end users.
-
DNS Failover
– Automatically routes your website visitors to an alternate location to avoid site outages.
-
ELB Integration
– It maps your root domain, or “zone apex” (e.g. mydomain.com without the ‘www’) directly to your Elastic Load Balancer.
-
CloudFront Zone Apex Support
– Helps deliver your website content; visitors to your website can now access your site at the zone apex
-
s3 zone apex support
– Visitors to your website hosted on Amazon S3 can access your site at the zone apex
Amazon Route 53 – Configuring Hosted Zones
The following steps show how to create a hosted zone and record set for your server or root zone.
-
Login or signup into Amazon AWS.
-
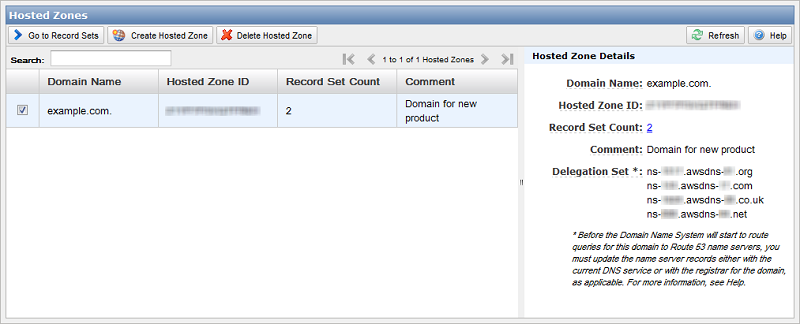
Select My Account / Console → AWS Management Console → route 53. It leads you to a dashboard showing the available hosted zones.
-
Click on Create Hosted Zones button to create a new hosted zone. Write the name of the domain in Domain name field and add some comment in the comment field. Comment filed is an optional field. Before pressing create button check the name of the domain. Finally press the create button. For example I am adding ‘testapp.com’ as domain name and add ‘test App ‘ comment in the comment field.
-
You can see that dashboard shows a new item in the Hosted Zone. Select the particular domain and click on Go to record sets.
-
You can see 2 record sets have been already created. One is NS type another is SOA type. From here you can create the hosts of your domain. For example – www.testapp.com, docs.testapp.com, www.docs.testapp.com, blog.testapp.com, www.blog.testapp.com etc.
-
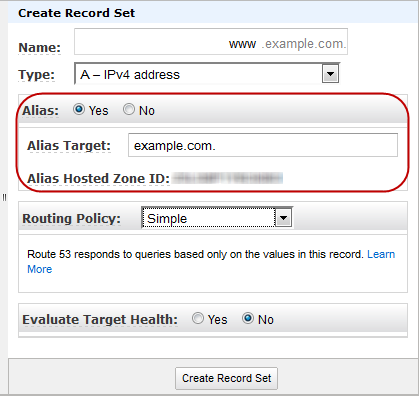
To create a new Record Set click on Create Record Set.
-
Enter the hostname without protocol; such as docs, api, etc. You don’t have to mention the http or https protocol.
-
Then you have to mention the type of record set.
-
For A-IPv4 – value is an IP address of your ec2 instance or elastic IP.
-
For CName – value is your domain name or any hostname
-
For MX – value is your domain name or any hostname
-
For AAAA – value is a IPv6 address
-
and so on.
-
-
Then press Create button to create the record set.
Hope this gives an idea on how to create your own hosted zone and record set in Amazon route 53. In my next blog I will describe different types of record set and their differences. If you have any question, feel free to comment here.